As an Amazon Associate, we earn from qualifying purchases. This helps support our site at no extra cost to you.
Golf Cart Brakes Maintenance: Adjust & Replace (2026)
Golf cart brakes maintenance comes down to three recurring jobs: check pedal travel, adjust the brake cable before the pedal gets too low, and replace brake shoes when the lining is thin, glazed, contaminated, or noisy. Most golf carts use rear drum brakes, so the work is simpler than automotive brake service, but it still affects whether the cart stops straight and holds on a hill.
If you are here because of golf cart brake problems, use this quick table first. A basic inspection takes 10 minutes, a golf cart brake adjustment usually takes about 15 minutes, and replacing brake shoes costs $20-$60 in parts and about an hour of work.
| Symptom | First Check | Likely Fix |
|---|---|---|
| Pedal travels too far | Cable stretch or worn shoes | Adjust cable, then inspect shoe thickness |
| Golf cart brakes squeaking | Surface rust, debris, glazed shoes, or worn lining | Make a few gentle stops, then clean/inspect if noise remains |
| Grinding noise | Shoe lining gone or drum damaged | Stop driving and replace shoes; inspect drum |
| Cart pulls to one side | Uneven shoe wear, stuck cable, contaminated shoe | Inspect both rear brakes and replace shoes in pairs |
| Parking brake will not hold | Cable stretch or weak shoe contact | Adjust cable or replace worn shoes |
If your cart already has a specific issue, jump to the common golf cart brake problems section for quick diagnosis.
How Golf Cart Brakes Work
Golf carts use simpler braking systems than cars. Understanding the basics makes maintenance and troubleshooting much easier.
Mechanical Drum Brakes (Most Common)
The vast majority of golf carts from Club Car, EZGO, and Yamaha use mechanical drum brakes on the rear axle only. Here is how they work:
- You press the brake pedal
- A steel cable pulls on a brake lever at each rear wheel
- The lever pushes two curved brake shoes outward against the inside of a spinning drum
- Friction between the shoes and drum slows the wheel
This system is simple, reliable, and cheap to maintain. The trade-off is that drum brakes fade with heat (extended braking on hills), collect dust inside the drum, and require periodic adjustment as the shoes wear down.
Self-adjusting vs manual-adjust: Club Car DS (1995+) and Precedent models use self-adjusting brakes that automatically compensate for shoe wear. Older Club Cars, most EZGO models, and Yamaha carts use manual-adjust brakes that require periodic cable tightening.
Hydraulic Disc Brakes
Some newer golf carts, particularly LSV-class models and many Chinese-manufactured brands like Icon, Evolution, and Star EV, come equipped with hydraulic disc brakes.
Disc brakes use a caliper that squeezes brake pads against a spinning rotor (disc) attached to the wheel hub. Hydraulic fluid transmits the force from the pedal to the caliper.
Advantages over drum brakes:
- Better stopping power, especially at higher speeds
- More consistent performance in wet conditions
- Better heat dissipation on hills and long descents
- Less maintenance (no cable stretching or shoe adjustment)
Disadvantages:
- Higher cost to repair (pads, rotors, fluid, calipers)
- Requires bleeding the hydraulic lines if air gets in
- Overkill for flat-terrain, low-speed use
Regenerative Braking (AC Motor Carts Only)
Electric golf carts with AC motors have a built-in bonus: regenerative braking. When you release the accelerator, the motor reverses into generator mode, converting the cart's momentum back into battery charge. This creates a natural slowing effect without touching the brake pedal.
Regenerative braking reduces wear on your mechanical brakes by up to 30-50% and adds roughly 15% more range per charge. If your cart has an AC motor, your brake shoes will last significantly longer than on a DC motor cart. For more on motor types, see our guide on golf cart motor draw.
Parking Brake
Every golf cart has a parking brake, either integrated into the brake pedal (push down to lock) or as a separate lever. The parking brake engages the same drum brakes as the service brake, holding the shoes against the drums mechanically.
What Brakes Come on Each Brand
Knowing your specific brake system makes it easier to buy the right parts and follow the right procedures.
| Brand & Model | Brake Type | Location | Self-Adjusting? | Notes |
|---|---|---|---|---|
| Club Car DS (1995+) | Mechanical drum | Rear only | Yes | OEM part #1018232-01 |
| Club Car Precedent/Onward | Mechanical drum | Rear only | Yes | Same shoes as DS 1995+ |
| Club Car Tempo | Mechanical drum | Rear only | Yes | Same shoes as DS 1995+ |
| EZGO TXT (1997+) | Mechanical drum | Rear only | No (manual) | OEM part #27943G01 |
| EZGO RXV (gas models) | Mechanical drum | Rear only | No (manual) | Same shoes as TXT |
| EZGO RXV (electric) | Drum + regen | Rear only | No (manual) | AC motor adds regen braking |
| Yamaha Drive/Drive2 | Mechanical drum | Rear only | No (manual) | Shoes shared with some EZGO models |
| Yamaha G29 | Mechanical drum | Rear only | No (manual) | Unique shoe size |
| Icon i-Series | Hydraulic disc | Front + rear | N/A | 4-wheel disc standard |
| Evolution Classic/Forester | Hydraulic disc | Front + rear | N/A | 4-wheel disc standard |
| Star EV (varies by model) | Drum or disc | Varies | Varies | Check your specific model |
For full brand comparisons beyond just brakes, see our reviews of Club Car, EZGO, and Yamaha.
DIY Brake Inspection (10-Minute Checklist)
You should inspect your brakes every 6 months or every 250-300 hours of use. This inspection requires no tools and catches most problems before they become dangerous.
Quick Checks (No Tools Required)
-
Pedal feel: Press the brake pedal firmly. It should feel solid and stop about halfway to the floor. A spongy pedal or one that sinks to the floor means something needs attention.
-
Pedal free play: The pedal should have 1 to 1.5 inches of free travel before you feel resistance. Too much free play means the cable has stretched or the shoes are worn. No free play means the brakes may be dragging.
-
Parking brake hold: Park on a slight incline, engage the parking brake, and release the service brake. The cart should not roll.
-
Rolling test: Drive the cart at moderate speed (10-15 mph) on a flat surface and apply the brakes. The cart should stop straight without pulling to either side.
-
Noise check: Listen for grinding, squealing, or clicking during braking. Any unusual noise warrants a closer look.
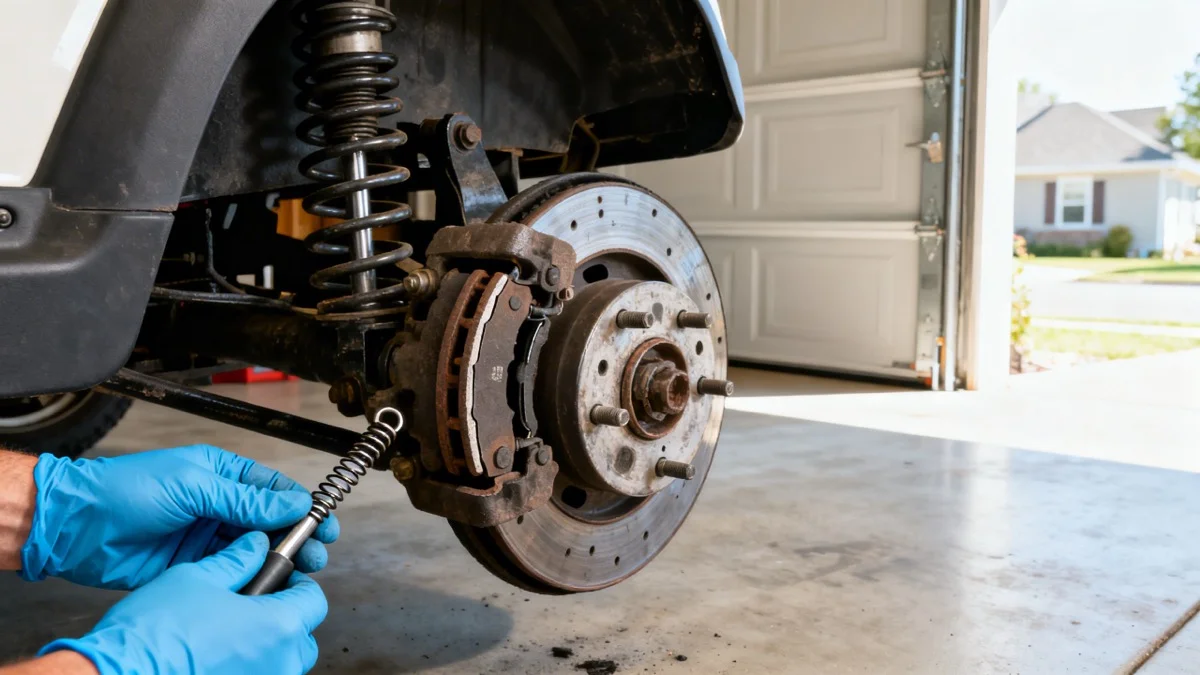
Visual Inspection (Requires Removing Wheels)
If any quick check raises concerns, or every 12 months at minimum:
- Jack up the rear of the cart and secure on jack stands
- Remove the rear wheels
- On drum brakes: look through the inspection slot or remove the drum
- Check brake shoe lining thickness (replace when under 1/16")
- Inspect shoes for cracks, glazing, or oil contamination
- Check brake springs for rust, stretching, or breakage
- Inspect brake cables for fraying, rust, or kinks
- Look for fluid leaks around the drum or backing plate
Before removing wheels, make sure the cart is supported from the frame, not the axle or bodywork. Our golf cart jack points guide shows safe lift points by brand.
This inspection is part of a good overall maintenance routine. Build it into your spring checklist and fall winterization prep.
How to Adjust Golf Cart Brakes
Brake adjustment is the most common maintenance task. Cables stretch over time and shoes wear down, increasing pedal travel and reducing stopping power. Most carts need adjustment every 6-12 months.
The basic golf cart brake adjustment rule is simple: tighten only until pedal travel improves, then confirm both rear wheels spin freely when the pedal is released. Brakes that drag after adjustment will overheat and wear quickly.
Cable Adjustment (All Brands)
This is the first adjustment to try when brakes feel loose.
What you need: A 1/2" wrench or adjustable wrench, a floor jack, and jack stands.
Steps:
- Jack up the rear of the cart so both rear wheels are off the ground
- Locate the brake cable adjuster nut. On most carts, this is near the brake pedal under the floorboard, or at the equalizer bar where the main cable splits into two cables (one per wheel)
- Tighten the adjuster nut by turning it clockwise. Tighten in small increments (1/4 turn at a time)
- After each adjustment, spin the rear wheels by hand. They should rotate freely without dragging
- Press the brake pedal. It should engage with 1 to 1.5 inches of free play
- If the wheels drag when released, back off the adjuster nut slightly
Star Wheel Adjustment (EZGO and Yamaha Manual-Adjust)
EZGO TXT and Yamaha carts with manual-adjust brakes have a star wheel adjuster accessible through a small hole in the backing plate or drum.
Steps:
- Jack up the rear and remove the wheel
- Locate the star wheel adjuster through the access hole on the backing plate
- Use a flathead screwdriver or brake spoon to turn the star wheel
- Turn the adjuster until the brake shoes contact the drum (you will feel resistance when spinning the wheel)
- Back off the star wheel 8-10 clicks until the wheel spins freely
- Repeat on the other side
- Reinstall wheels and test
Self-Adjusting Brakes (Club Car 1995+)
Club Car's self-adjusting brakes maintain proper shoe-to-drum clearance automatically. If your Club Car brakes still feel loose, the issue is likely cable stretch (adjust the cable as described above) or worn shoes that need replacement.
To reset the self-adjusters, drive the cart in reverse and apply the brakes firmly 5-6 times. This forces the adjuster mechanism to click forward and take up the slack.
How to Replace Brake Shoes
When adjustment no longer restores proper braking, it is time for new shoes. This is a straightforward DIY job that takes about an hour.
When to Replace
- Brake lining worn to 1/16" or less
- Shoes are cracked, glazed (shiny and smooth), or oil-contaminated
- Brakes squeal or grind even after adjustment
- Pedal goes to the floor even with cables fully tightened
- Shoes have been in service for 5+ years regardless of appearance
Tools and Parts Needed
- Floor jack and jack stands
- Lug wrench
- 1/2" socket set
- Pliers (needle-nose and standard)
- Brake spring tool or strong flathead screwdriver
- Brake parts cleaner (aerosol)
- Wire brush
- New brake shoes with springs (always replace springs with shoes)
Club Car Brake Shoe Replacement
Club Car DS (1995+), Precedent, Onward, and Tempo all use the same brake shoes (OEM #1018232-01).
Check Price: Club Car Brake Shoes + Spring KitSteps:
- Jack up the rear, secure on stands, remove wheels
- Remove the brake drum (pull straight off or tap gently with a rubber mallet)
- Note how the springs and shoes are arranged (take a photo for reference)
- Use pliers or a spring tool to remove the retaining springs
- Remove the old brake shoes from the backing plate
- Clean the backing plate and drum interior with brake cleaner and a wire brush
- Apply a thin layer of brake grease to the shoe contact points on the backing plate (where the shoes slide)
- Install new shoes and springs in the reverse order of removal
- Reinstall the drum and wheel
- Repeat on the other side (always replace both sides)
- Pump the brake pedal several times to seat the new shoes
- Test drive at low speed in a safe area
EZGO and Yamaha Brake Shoe Replacement
EZGO TXT (1997+), Workhorse, and many Yamaha models share similar brake shoe sizes (OEM #27943G01 for EZGO).
Check Price: EZGO/Yamaha Brake Shoes + Spring KitThe replacement process is identical to the Club Car steps above. The main difference is that EZGO and Yamaha drums may be secured with a cotter pin through the axle nut rather than simply pulling off.
If your brake shoes, springs, and hardware are all worn, a complete brake assembly saves time over buying individual parts. The OMEIPMEO brake assembly fits EZGO TXT, PDS, Medalist, and Yamaha G14 through G22 and includes everything for both sides.
Check OMEIPMEO Brake Assembly Price on AmazonDisc Brake Upgrades
If you drive in hilly areas, carry heavy loads, or have made your cart faster with a motor or controller upgrade, your stock drum brakes may not be enough. A disc brake conversion is the most effective brake upgrade available.
When a Disc Brake Upgrade Makes Sense
- Your cart regularly exceeds 20 mph (especially street-legal carts)
- You drive on hilly terrain where brake fade is a concern
- You have upgraded your motor or controller for more speed
- You carry heavy loads or frequently have a full cart of passengers
- You live in a wet climate where drum brakes underperform
Types of Conversion Kits
Rear disc brake kits ($200-$400): Replace your existing drum brake assemblies. They bolt to the same mounting points and use the existing brake cables and pedal. No drilling or welding required. Most kits install in 1-2 hours.
Front disc brake kits ($200-$400): Add hydraulic disc brakes to the front axle. Since most golf carts have no front brakes, this is a pure addition, not a replacement. Front kits are hydraulic (come pre-filled with fluid) and dramatically improve stopping distance.
Full four-wheel disc kit ($400-$700): Both front and rear disc brakes. This is the ultimate upgrade for high-speed or heavy-use carts.
Installation Notes
Most disc brake kits are bolt-on with basic hand tools. The rear kit replaces the drum assembly directly, while front kits mount to the spindle or hub. Follow the manufacturer instructions for your specific cart model, and always bed in new brake pads by making 20-30 gradual stops from moderate speed before hard braking.
Common Golf Cart Brake Problems and Fixes
Here are the most frequent brake issues golf cart owners encounter, with likely causes ranked by probability.
Spongy or Soft Brake Pedal
Cable-operated brakes (most golf carts):
- Stretched brake cable (most common). Tighten the adjuster nut. See cable adjustment
- Worn brake shoes. Inspect shoe lining thickness. Replace if under 1/16"
- Corroded or fraying cable. Replace the cable ($15-$40 per side)
Hydraulic brakes:
- Air in the brake lines. Bleed the brakes at each caliper
- Low brake fluid. Check the reservoir and top off with DOT 3 or DOT 4 fluid
- Leaking brake line or caliper seal. Inspect for visible fluid on lines and calipers
Grinding or Squealing Noise
If your search was "golf cart brakes squeaking," start here. A short squeak after storage can be light surface rust, but repeated squealing or any grinding means the brake assembly needs inspection.
- Worn brake shoes. The backing plate is contacting the drum, metal on metal. Replace shoes immediately
- Debris inside the drum. Remove the drum and clean with brake cleaner
- Glazed shoes. Shoes have a smooth, shiny surface instead of a rough texture. Lightly scuff with sandpaper or replace
- Warped or scored drum. If the drum has deep grooves or is out-of-round, replace it ($30-$80)
Cart Pulls to One Side When Braking
- Uneven shoe wear. One side is worn more than the other. Replace shoes on both sides
- Stuck cable on one side. Lubricate or replace the affected cable
- Oil or grease on one set of shoes. A leaking axle seal can contaminate shoes. Fix the leak and replace the shoes
- Out-of-round drum on one side. Replace the drum
Cart Won't Stop or Takes Too Long to Stop
- Severely worn shoes. No lining material left. Replace immediately
- Cable stretched beyond adjustment range. Replace the cables
- Brake fade from heat. Let brakes cool before driving on hills. Consider a disc brake upgrade
- Wrong shoes installed. Verify the correct part number for your cart model
Parking Brake Won't Hold
- Parking brake cable needs adjustment. Tighten the separate parking brake cable or adjust the main cable
- Worn shoes. New shoes restore parking brake effectiveness
- Parking brake mechanism worn or broken. Inspect the pedal lock mechanism or lever assembly. Replace if damaged
Cart Rolls Backward on Hills
This is closely related to parking brake issues. If the parking brake holds on flat ground but not on hills:
- Shoes need replacement. Reduced friction surface means less holding force
- Cable stretch. The parking brake is not fully engaging the shoes against the drum
- Weak return springs. Springs pulling shoes away from drum. Replace springs with shoes
For broader troubleshooting beyond brakes, see our full golf cart troubleshooting guide. If you are trying to price the next step, use the golf cart repair cost estimator. If the issue is electrical rather than mechanical, our won't start guide may help.
Golf Cart Brake Maintenance Schedule
Consistent maintenance prevents 90% of brake problems. Here is the recommended schedule by use intensity.
| Task | Light Use (weekends) | Moderate Use (3-4x/week) | Heavy Use (daily) |
|---|---|---|---|
| Pedal feel check | Monthly | Every 2 weeks | Weekly |
| Parking brake test | Monthly | Monthly | Every 2 weeks |
| Cable adjustment check | Every 6 months | Every 3 months | Every 2 months |
| Visual shoe inspection | Annually | Every 6 months | Every 3-4 months |
| Brake shoe replacement | Every 5-7 years | Every 3-5 years | Every 2-3 years |
| Cable replacement | Every 7-10 years | Every 5-7 years | Every 3-5 years |
| Spring replacement | With every shoe change | With every shoe change | With every shoe change |
Additional tips:
- Always clean the drum interior and backing plate when you have the wheels off for any reason (tire rotation, tire replacement)
- Lubricate cable pivot points and brake lever joints with white lithium grease every 6 months
- In coastal or humid areas, inspect more frequently as moisture accelerates corrosion on cables and springs. See our rust prevention guide for additional protection tips
- Keep brake parts cleaner and a wire brush in your golf cart tool kit
What Brake Work Costs at a Shop
Not everyone wants to DIY. Here is what to expect if you take your cart to a professional.
| Service | Typical Cost | Time |
|---|---|---|
| Brake inspection + adjustment | $30-$75 | 20-30 min |
| Brake shoe replacement (both wheels) | $100-$200 | 45-60 min |
| Brake cable replacement (one side) | $50-$100 | 30-45 min |
| Brake cable replacement (both sides) | $80-$175 | 45-75 min |
| Drum replacement (one side) | $75-$150 | 30-45 min |
| Disc brake conversion (rear) | $350-$600 installed | 1.5-2 hours |
| Complete brake overhaul | $200-$400 | 1.5-2 hours |
Prices vary by region and shop. Find a shop near you through our repair directory or dealer directory.
The Bottom Line on Golf Cart Brakes
Golf cart brakes are low-maintenance, but they are not no-maintenance. A 10-minute inspection every few months and a $30 set of brake shoes every few years keeps your cart stopping safely. The most common mistake owners make is ignoring gradual changes in pedal feel until the brakes barely work at all.
If you take one thing away from this guide: check your brake pedal travel once a month. If it is creeping closer to the floor, adjust the cable. If adjustment does not help, inspect the shoes. Catching wear early is free. Waiting until you cannot stop is expensive and dangerous.
Keeping up with brakes is part of good overall cart ownership. For the full picture on maintenance, check our complete maintenance guide, and for how all this upkeep affects your cart's longevity, see our guide on how long golf carts last.
Frequently Asked Questions
How do I know what brake shoes fit my golf cart?
Check your cart's make, model, and year, then match the OEM part number. Club Car DS (1995+), Precedent, Onward, and Tempo all use #1018232-01. EZGO TXT (1997+) uses #27943G01. Yamaha models vary by year. When in doubt, bring an old shoe to the parts counter or check your owner's manual by serial number.
Can I drive with bad golf cart brakes?
You should not. Golf carts operate on roads, in neighborhoods, near pedestrians, and around other vehicles. Failed brakes on a hill can send the cart into traffic, parked cars, or water hazards. Brake repair is cheap and fast. Fixing the aftermath of a brake failure is not.
Do I need to break in new brake shoes?
Yes. New brake shoes need 20-30 moderate stops to bed in properly. The bedding process transfers a thin layer of friction material onto the drum surface, creating a consistent braking feel. Avoid hard stops during the first few miles after installation.
How do I stop my golf cart from rolling on hills?
Engage the parking brake every time you park, even on slight inclines. If the parking brake does not hold, the cable or shoes need attention. For extra security in steep areas, turn the front wheels into the curb (like parking a car on a hill) and place wheel chocks behind the rear tires.
Are disc brakes worth the upgrade on a golf cart?
For carts that stay under 15 mph on flat ground, drum brakes are perfectly adequate. Disc brakes are worth the $200-$500 investment if you drive over 20 mph, navigate hills regularly, carry heavy loads, or want the safety margin of better stopping power. They are especially valuable on street-legal carts that share the road with traffic.
Why do my brakes squeal after sitting all winter?
Surface rust forms on brake drums and shoes during storage, especially in humid climates. This is normal and usually resolves after a few stops. If the squeal persists after 10-15 stops, remove the drums and clean with brake parts cleaner. Proper winterization reduces this issue.
Golf Cart Search
Find the Best Golf Carts of 2026
Compare top-rated models, read expert reviews, and find the perfect cart for your needs.


