As an Amazon Associate, we earn from qualifying purchases. This helps support our site at no extra cost to you.
If your golf cart brake lights are not working, do not start by ordering a whole light kit. Brake-light problems usually come down to one of five things: no 12V power, a bad brake switch, a blown fuse, a failed timer relay, or a wiring problem between the pedal and rear lights.
This guide shows you how to diagnose the problem in order, with specific checks for Club Car, EZGO, and Yamaha carts. If all of your lights are dead, start with the golf cart fuse box guide. If the problem appeared after adding accessories, keep the voltage reducer wiring guide open too.
Quick Diagnosis: Match Your Symptom
Start here. The symptom usually tells you which circuit to test first.
| Symptom | Most likely causes | First test |
|---|---|---|
| Taillights work, brake lights do not brighten | Bad brake switch, failed timer relay, open brake wire, wrong rear lamp type | Test switch continuity |
| Brake lights stay on after key is off | Stuck switch, misadjusted pad, failed timer relay, pinched wires | Disconnect brake switch input |
| All lights are dead | Blown fuse, no 12V reducer output, bad ground, dead accessory feed | Test fuse and 12V feed |
| One rear brake light works, one does not | Bad lamp module, connector, ground, or rear harness branch | Swap rear lamp connectors |
| Brake lights quit after lithium conversion | Reducer wiring, accessory negative, blown fuse, BMS shutdown, moved harness | Test 12V at fuse block |
| Brake lights flicker | Weak ground, loose connector, bad switch pad, low reducer output | Wiggle-test and meter voltage |
| Fuse blows when braking | Shorted brake wire, wrong fuse, failed lamp, crushed harness | Inspect pedal and rear harness |
If the cart is used on public roads, do not ignore this. Federal low-speed vehicle rules include stop lamps, and state or city golf cart rules often require working brake lights for neighborhood use. Check the golf cart laws hub and your state page, especially in big cart markets like Florida, Arizona, South Carolina, Texas, and Georgia.
Before You Test Anything
Golf cart lights are low voltage, but the battery pack can deliver a lot of current. Work carefully.
- Park on level ground.
- Turn the key off.
- Put the cart in neutral.
- Set the parking brake only after checking whether it affects the brake lights.
- Put the tow/run switch in tow or maintenance mode if equipped.
- Remove rings, watches, and loose metal jewelry.
- Take photos before unplugging connectors.
- Disconnect the main negative battery cable before cutting, crimping, or moving wires.
For live voltage testing, reconnect only what you need and keep tools away from battery terminals. If you are not comfortable testing DC circuits, use the repair directory or find repair shops by state.
Tools and Parts Worth Having
You can diagnose most golf cart brake-light problems with a multimeter and a few small parts.
| Tool or part | Typical cost | Why it helps |
|---|---|---|
| Digital multimeter | $12 to $30 | Tests 12V power, continuity, grounds, and fuse output |
| Blade fuse assortment | $10 to $20 | Replaces light-kit and accessory fuses |
| Brake pad switch | $14 to $40 | Common fix when taillights work but brake trigger fails |
| Inline fuse holder | $7 to $15 | Fixes cracked or corroded accessory fuse holders |
| Heat-shrink connectors | $8 to $20 | Repairs wires better than electrical tape |
| 12V voltage reducer | $25 to $80 | Required for most 36V and 48V electric carts |
The multimeter is the first buy. It stops you from guessing between a switch, fuse, ground, or reducer.
Check Price: AstroAI Digital MultimeterIf you find more than one improvised inline fuse under the seat, clean it up with a fuse block. It makes future lighting, horn, USB, backup camera, and sound bar troubleshooting much easier.
Kohree 6-Way Fuse BlockStep 1: Confirm You Have Real Brake Lights
This sounds obvious, but many carts only have taillights. A taillight glows when the headlights are on. A brake light gets brighter when you press the brake pedal.
Look at the rear lamp wiring:
- Two-wire rear lamps often have ground plus running light only.
- Three-wire rear lamps usually have ground, running light, and brake or turn signal input.
- Complete street-legal kits usually include rear brake-light function, turn signals, a horn, and a brake switch.
- Basic headlight and taillight kits may not include brake-light wiring at all.
If your cart only has two-wire taillights, a new brake switch will not magically add brake lights. You may need a full rear lamp and harness upgrade. Use the LED light kit guide and turn signal kit guide before ordering parts.
Step 2: Check the Fuse and 12V Feed
If brake lights, turn signals, horn, and headlights are all dead, the brake switch is probably not the first problem. Start at the power feed.
- Find the light kit fuse or accessory fuse block.
- Pull the fuse and inspect it.
- Test continuity through the fuse.
- Reinstall the correct fuse size.
- Test for 12V on both sides of the fuse holder.
Most golf cart accessories use 12V power. Gas carts usually have a 12V battery. Electric carts usually need a voltage reducer because the main battery pack is 36V, 48V, 51.2V lithium, or 72V.
If your meter reads 0V at the light-kit fuse, work upstream:
- battery or pack feed
- voltage reducer input
- voltage reducer output
- key-switched accessory feed
- ground bus
- inline fuse near the reducer
If the reducer output is dead, replace or rewire it before chasing the brake switch. A 48V-to-12V 30A reducer is enough for most carts with lights, horn, USB, light bar, and a modest stereo.
Check Price: 10L0L 48V-to-12V 30A ReducerFor 36V carts, use the 36V version and wire it to the full pack, not one or two batteries. The 36V vs 48V guide explains why single-battery tapping damages packs.
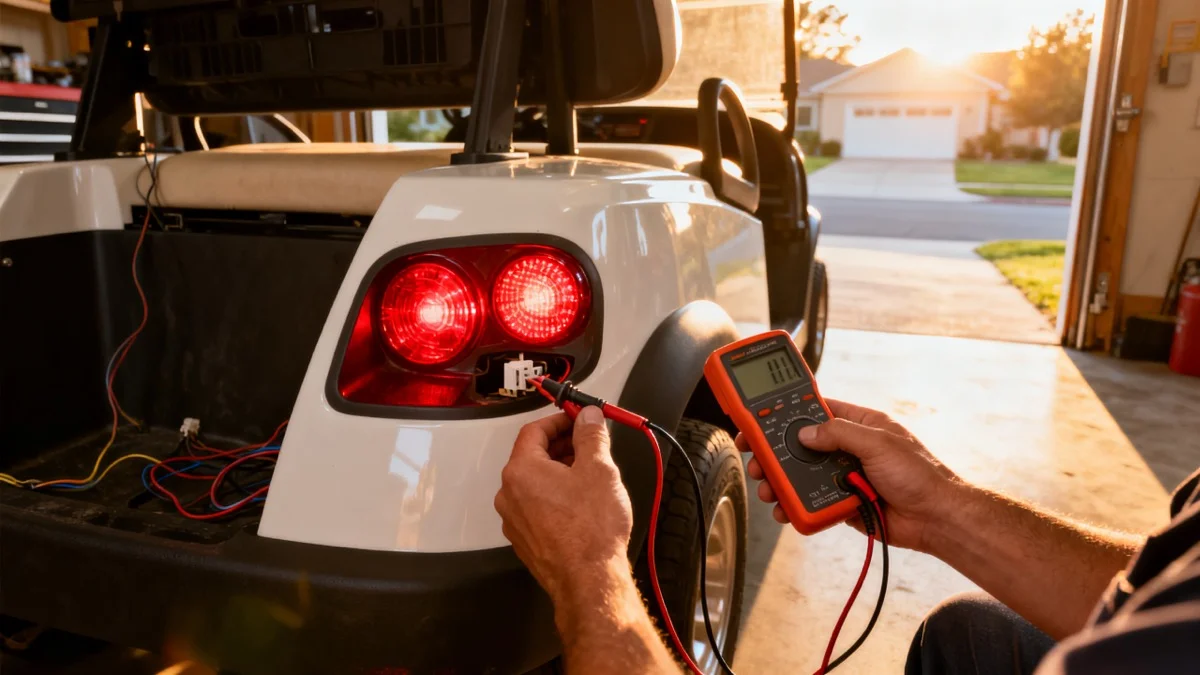
Step 3: Test the Brake Light Switch
Most aftermarket kits use one of two switch styles.
| Switch type | Where it mounts | Common failure |
|---|---|---|
| Pressure pad switch | On the brake pedal pad | Pad wears out, wire breaks, pad is mounted too high or low |
| Mechanical plunger or lever switch | On pedal linkage or bracket | Misadjustment, stuck plunger, broken spring, loose bracket |
A universal pad switch usually mounts on the lower portion of the brake pedal. The Red Hawk LGT-138 instruction sheet shows this same general location for EZGO TXT, Club Car DS, Club Car Precedent, and Yamaha G14 through Drive carts. It also warns that the switch is for low-current 12V DC use.
Continuity Test
Disconnect the two switch leads. Set your multimeter to continuity.
- Touch one probe to each switch lead.
- Press and release the brake pedal.
- Watch whether the meter changes state.
Most switches should change from open to closed when the brake is pressed. Some circuits work the opposite way, depending on the timer relay or controller input. The key is change. If the reading never changes, the switch is bad or not being pressed correctly.
Voltage Test
With the circuit powered, test for 12V at the switch input. If the switch never receives power, it cannot send power to the rear brake lights.
If 12V enters the switch but never leaves when pressed, replace or adjust the switch. If 12V leaves the switch but the brake lights do not brighten, move downstream to the timer relay, harness, and rear lamps.
Step 4: Check the Brake Timer Relay
Many golf cart light kits use a brake timer relay. The timer lets the brake lights stay on briefly when you set the parking brake, then shut off so the battery does not drain all night.
The timer relay is often a small black box near the brake switch wiring, under the floor area, or behind the dash. It may connect to the brake switch, 12V power, ground, and brake-light output.
Timer relay symptoms:
- brake lights stay on for hours
- brake lights never brighten
- lights work only when wires are wiggled
- brake lights work once, then fail until the cart is restarted
- fuse blows when the pedal is pressed
To isolate it, test for voltage into and out of the relay. If the switch output reaches the timer but the timer output never changes, the timer is suspect. If bypassing the timer makes the brake lights work, replace the timer or follow the light-kit maker's approved wiring path.
Step 5: Inspect Grounds and Rear Connectors
A weak ground can make brake lights look like a switch problem. Rear lamps need a clean ground path. On many electric carts, the frame is not a dependable automotive-style ground, so the ground wire should run back to the harness or negative bus.
Check these spots:
- rear lamp ground wires
- 9-pin or multi-pin light harness connector
- crimp connectors behind taillights
- ground bus at the fuse block
- reducer output negative
- battery pack negative or 12V battery negative
- corroded connectors near the rear seat footrest
Flickering lights usually mean a weak ground, loose connector, or a brake switch wire that moves with the pedal. If one side works and the other does not, swap rear lamp connectors left to right. If the problem follows the lamp, the lamp module is bad. If it stays on the same side, the harness or ground is bad.
For carts used in beach towns, corrosion moves higher on the list. Salt air attacks small connectors first. The rust prevention guide, rain driving guide, and garage storage guide cover prevention.
Step 6: Check Brand-Specific Trouble Spots
The brake-light circuit is usually part of the accessory system, but brand layout still matters.
Club Car Brake Light Checks
Club Car DS and Precedent carts are common aftermarket-light-kit platforms. Check the pedal pad switch first, then the under-seat accessory wiring.
On older 48V Club Car carts, accessory wiring can get tangled with On-Board Computer charging behavior. If the issue appeared after installing a reducer or lithium battery, verify the reducer wiring and charger path. The Club Car charger guide, charging port problems guide, and lithium conversion guide are good next reads.
If you have a newer Club Car Onward or Tempo with factory lighting, do not assume every wire is aftermarket. Use the serial number and manual before cutting into the harness.
EZGO Brake Light Checks
EZGO TXT carts often use aftermarket pad switches and 9-pin light harnesses. If taillights work but brake lights do not, the pad switch, timer relay, or 9-pin connection is the usual path.
EZGO RXV and newer lithium models can be less straightforward because some brake behavior is tied to electronic braking and controller logic. If brake lights stay on along with locked brakes, no movement, or warning beeps, treat it as a broader brake/controller problem. Start with the EZGO review, golf cart brakes guide, and troubleshooting guide.
Yamaha Brake Light Checks
Yamaha Drive and Drive2 carts with factory lighting are usually tidy, but older G-series carts may have add-on harnesses from several owners ago. Check the brake pad location, rear lamp connectors, and voltage reducer output.
Gas Yamaha carts have a 12V battery, so a reducer is usually not part of the brake-light circuit. If the gas cart also has weak starting, dim lights, or a 12V battery that keeps dying, use the starter generator guide and fuel pump guide to rule out charging problems.
Step 7: Solve the Common Scenarios
Taillights Work, Brake Lights Do Not
This is the cleanest diagnosis. Running-light power and ground are already present, so focus on the brake trigger.
Check in this order:
- Brake switch adjustment
- Switch continuity
- 12V into switch
- 12V out of switch when pedal is pressed
- Brake timer relay output
- Brake-light wire at rear harness
- Rear lamp brake input
If the rear lamp has only two wires, you may not have brake-capable lamps. Replace the rear lights or install a full light kit.
Brake Lights Stay On
First decide whether the light is truly stuck or operating on a normal delay. Some kits leave the brake lights on for about a minute after the parking brake is set.
If the lights stay on longer:
- Unplug the brake switch.
- If the lights go out, adjust or replace the switch.
- If they stay on, unplug the timer relay.
- If they go out, replace the timer relay.
- If they still stay on, look for a short between 12V power and the brake-light output wire.
Do not leave the cart parked with brake lights on. A stuck brake-light circuit can drain a 12V accessory battery, keep a voltage reducer awake, or slowly pull down the main pack.
Brake Lights Quit After a Lithium Conversion
Lithium conversions often disturb accessory wiring. The cart may drive perfectly while the light circuit loses its old 12V source.
Look for:
- old accessory wires removed from the lead-acid pack
- reducer input no longer connected to full pack positive and negative
- reducer not compatible with new pack voltage
- accessory negative connected to the wrong point
- light fuse blown during battery swap
- brake switch wire pinched under the new battery tray
- BMS sleep mode cutting accessory power
Use the lithium battery not charging guide, battery voltage chart, and 48V vs 72V guide if the voltage side looks wrong.
Brake Light Fuse Blows When Pedal Is Pressed
A fuse that blows only when you brake usually means the short is on the brake-light output side, not the running-light circuit.
Inspect:
- switch leads at the pedal
- timer relay wires
- rear harness branch
- wires near the rear seat kit and footrest
- lamp sockets or LED modules
- spots where a screw may have pierced the harness
Replace the fuse with the same amperage only after fixing the short. If a 10A fuse keeps blowing, a 15A fuse is not a repair.
When to Buy a Full Light Kit Instead
Replacing one brake switch makes sense when the rest of the light system is clean. A full kit makes more sense when the cart has a hacked harness, missing turn signals, no horn, or rear lamps that cannot function as brake lights.
If your cart already has headlights and taillights with a compatible harness, the 10L0L 9-pin add-on kit can add turn signals, horn, hazard function, and brake switch hardware without replacing everything.
Check Price: 10L0L Universal Turn Signal KitIf you own a Club Car Precedent-style cart and need a full lighting package, the OMEIPMEO Deluxe LED kit is a value-focused option that existing site content already uses for light-kit coverage.
Check OMEIPMEO Deluxe LED Kit PriceFor a full road-use build, brake lights are only one piece. You may also need mirrors, seat belts, windshield, DOT tires, insurance, and registration. The broader decision lives in our street-legal guide, LSV vs golf cart guide, and best street legal golf carts guide.
Repair Cost Guide
| Repair | DIY parts cost | Typical shop cost |
|---|---|---|
| Replace fuse | $1 to $5 | $25 to $75 minimum labor |
| Adjust brake switch | $0 | $50 to $120 |
| Replace brake pad switch | $14 to $40 | $75 to $175 |
| Replace timer relay | $20 to $60 | $100 to $220 |
| Repair rear lamp connector | $5 to $25 | $75 to $175 |
| Replace voltage reducer | $25 to $80 | $125 to $300 |
| Install full light kit | $100 to $250 | $200 to $500 total |
| Trace modified harness short | $0 to $40 supplies | $100 to $300+ |
If the repair estimate gets close to the value of the cart's whole lighting system, compare options before approving the work. The golf cart value guide, used golf cart prices by brand, and how much is a golf cart guide help.
Prevention: Keep Brake Lights Working
Most repeat brake-light problems come from poor wiring.
- Mount brake switches where the pedal actually activates them.
- Keep switch wires away from pedal movement.
- Use zip ties, but do not crush insulation.
- Add grommets where wires pass through metal or plastic.
- Use heat-shrink connectors instead of electrical tape.
- Keep the light kit on a fused 12V circuit.
- Do not tap one battery for 12V accessories.
- Check rear lamp connectors after installing a rear seat kit.
- Inspect wiring after transporting your cart.
- Test brake lights before night or public-road driving.
If you store the cart for months, include lights in your spring startup checklist. Our winterization guide and spring maintenance checklist cover the full seasonal routine.
Helpful Sources
- 49 CFR 571.500 Low-Speed Vehicles
- Red Hawk LGT-138 brake pad switch instructions
- GolfCartStuff lighting Q&A
- 10L0L Club Car DS light kit installation guide
Golf Cart Brake Light FAQs
Why are my golf cart brake lights not working?
The most common causes are a bad brake light switch, blown fuse, weak ground, failed timer relay, no 12V reducer output, wrong wiring, or bad rear LED modules.
Why do my golf cart brake lights stay on?
Brake lights that stay on usually point to a stuck switch, misadjusted pedal pad, failed timer relay, pinched switch wires, or an electronic brake/controller issue on newer carts.
How much does it cost to fix golf cart brake lights?
A simple fuse or connector repair can cost $1 to $20. A brake pad switch is usually $14 to $40. Shop diagnosis and wiring repair commonly runs $100 to $300.
Do golf cart brake lights need 12V power?
Most aftermarket brake light switches and light kits need 12V DC power. Gas carts usually have 12V. Electric carts usually need a DC-to-DC voltage reducer.
Can I test a golf cart brake light switch with a multimeter?
Yes. Disconnect the switch leads, set the meter to continuity, and press the brake pedal. A working switch should change state. If it never changes, adjust or replace it.
Do I need a brake timer relay on a golf cart?
Many aftermarket kits use a timer relay so brake lights shut off after a delay when the parking brake is set. If it fails, lights may stay on or never brighten.
Why do my taillights work but my brake lights do not?
That usually means ground and running-light power are present, but the brake trigger is missing. Check the switch, timer relay, rear brake wire, and 3-wire lamp setup.
Why did my brake lights quit after a lithium conversion?
Lithium conversions often disturb old accessory wiring. Check reducer wiring, accessory negative, BMS shutdown, blown fuses, and whether the switch still has stable 12V power.
Are brake lights required on a street legal golf cart?
Yes for true low-speed vehicles. Federal LSV rules require stop lamps. Local golf cart rules vary, so check your state and city.
Can I drive my golf cart if the brake lights do not work?
On private property, the risk is mostly safety and liability. On public roads or in communities that require lights, do not drive until the brake lights work.
What fuse size do golf cart brake lights use?
Aftermarket light kits commonly use 5A to 15A fuses. Match the holder or kit instructions. Do not install a larger fuse to stop repeated blowing.
Should I replace the brake switch or the whole light kit?
Replace the switch if only the brake-light trigger fails. Consider a full light kit if the harness is messy, the rear lamps lack brake function, or several lighting functions fail.
Golf Cart Search
Find the Best Golf Carts of 2026
Compare top-rated models, read expert reviews, and find the perfect cart for your needs.


