As an Amazon Associate, we earn from qualifying purchases. This helps support our site at no extra cost to you.
Want to add LED lights, a stereo, USB charging ports, or a horn to your golf cart? You need a 12V electrical system first. For a guide to specific dashboard and tech upgrades like digital gauges, USB chargers, and keyless ignition, start there and come back here for the wiring. Your golf cart runs on 36V or 48V, and connecting a 12V accessory directly to that pack would fry it instantly.
This guide covers everything: how voltage reducers work, which size to buy, how to wire a fuse block, what wire gauge to use, and brand-specific installation tips for EZGO, Club Car, and Yamaha. Whether you are adding a pair of headlights or building out a full accessory system with lights, speakers, and heated seats, the wiring fundamentals are the same.
If you have not worked on your cart's electrical system before, grab a basic multimeter and tool kit before starting. You will use it throughout this project.
What Is a Voltage Reducer (And Why You Need One)
A voltage reducer, also called a DC-DC converter, takes the high voltage from your golf cart's battery pack (36V or 48V) and steps it down to 12V. That 12V output powers all of the standard automotive accessories you want to add: LED lights, speakers, fans, USB ports, horns, turn signals, and more.
Why not just tap one battery? This is the most common question, and the answer is always the same: do not do it. Tapping a single 12V battery (or two 6V batteries in series) from your pack creates uneven discharge. That battery drains faster than the rest, shortening its life and potentially damaging your entire battery set. A voltage reducer draws evenly from the full pack and is the only safe method. See our battery guide for more on how battery packs work.
What about a power inverter? Inverters convert DC to AC (household power). Voltage reducers convert DC to lower-voltage DC. For golf cart accessories, you want DC-to-DC. Inverters waste significant energy in the conversion and are only needed for AC devices like laptop chargers.
Linear vs Switching: Which Type to Buy
There are two types of voltage reducers. One is obsolete. Buy the other.
| Feature | Linear Regulator | Switching (DC-DC) Converter |
|---|---|---|
| Efficiency | 25-33% | 85-95% |
| Heat output | Extremely hot | Minimal |
| Max practical amperage | 2-3A | 30A+ |
| Price | $15-30 | $25-80 |
| Verdict | Avoid | Buy this |
A linear regulator on a 48V system dumps 36 volts as pure heat. At 10 amps, that is 360 watts of wasted energy, enough to melt plastic and start a fire. Switching converters do the same job at a fraction of the heat. There is no reason to buy a linear regulator in 2026.
How to Size Your Voltage Reducer
Step 1: List every 12V accessory you plan to install (now and in the near future).
Step 2: Add up total amperage draw using the reference table below.
Step 3: Multiply by 1.5 for a safety margin.
Step 4: Round up to the next available reducer size (10A, 15A, 20A, or 30A).
Example: LED headlights (3A) + taillights (1A) + stereo and speakers (4A) + USB port (2A) + horn (2A) + turn signals (1A) = 13A total. Multiply by 1.5 = 19.5A. Buy a 20A reducer.
Running a reducer at 100% capacity continuously shortens its lifespan. The 1.5x rule gives headroom and keeps the unit cool.
| Reducer Size | Watts | Best For | Price Range |
|---|---|---|---|
| 10A (120W) | Basic lighting + USB | Headlights, taillights, USB charger, horn | $20-35 |
| 15A (180W) | Moderate accessories | Above + radio/speakers + turn signals | $30-45 |
| 20A (240W) | Well-equipped cart | Above + LED light bar + fan | $35-55 |
| 30A (360W) | Fully loaded cart | Above + heated seats or multiple high-draw accessories | $45-80 |
12V Accessory Power Draw Reference
Use this table to calculate your total amperage needs. These are real-world draws, not theoretical maximums.
| Accessory | Amps (12V) | Watts | Notes |
|---|---|---|---|
| LED headlights (pair) | 2-4A | 24-48W | LED draws far less than halogen |
| LED taillights (pair) | 0.5-1.5A | 6-18W | Very low draw |
| LED light bar (20-30") | 5-10A | 60-120W | Big draw; size your reducer for this |
| LED underglow kit | 1-2A | 12-24W | Cosmetic; low draw |
| Turn signal kit (LED) | 1-2A | 12-24W | Required for street-legal carts |
| Marine stereo head unit | 1-2A | 12-24W | Head unit alone is modest |
| Speakers with amplifier | 3-8A | 36-96W | Amplifier is the real draw |
| USB charging ports (dual) | 1-2A | 12-25W | Under 2A even with two devices |
| Phone mount with charger | 0.5-1A | 6-12W | Minimal draw |
| 12V fan (single) | 1-3A | 12-36W | Helpful in hot climates |
| Electric heater | 10-15A | 120-180W | Massive draw; needs its own circuit |
| Heated seat cushion | 3-5A | 36-60W | Much less draw than a space heater |
| Horn | 1-3A | 12-36W | Intermittent; still fuse it |
| Backup camera | 0.3-0.5A | 4-6W | Nearly negligible |
| Windshield wiper motor | 2-4A | 24-48W | Useful for enclosed carts |
| 12V dome/map light | 0.5A | 6W | Minimal |
Most golf cart owners fall in the 10-20A range. Only carts with electric heaters, large light bars, or powerful sound systems need 30A.
Wire Gauge Selection Guide
The wire connecting your components must be thick enough to carry the current without overheating. Undersized wire is a fire hazard. Oversized wire wastes money but is never dangerous, so when in doubt, go thicker.
| AWG | Max Amps | Use In Golf Carts |
|---|---|---|
| 8 AWG | 40A | Heavy-duty main feed, battery interconnects |
| 10 AWG | 30A | Main feed from reducer to fuse block (most common) |
| 12 AWG | 20A | High-draw accessories (heaters, large light bars) |
| 14 AWG | 15A | Medium-draw accessories (light bars, amplifiers) |
| 16 AWG | 10A | Standard accessories (headlights, horn, fans) |
| 18 AWG | 7A | Low-draw accessories (USB ports, taillights, LED strips) |
The critical rule: The wire must handle more amperage than the fuse protecting it. If you put a 10A fuse on a circuit, use at least 14 AWG wire (rated for 15A). The fuse should blow before the wire overheats.
Wire length matters. For runs longer than 10 feet, go up one gauge size to compensate for voltage drop. A 16 AWG wire that performs fine at 5 feet may cause dim lights at 15 feet.
Marine-Grade Wire vs Standard
| Feature | Standard PVC | Marine-Grade Tinned |
|---|---|---|
| Conductor | Bare copper | Tin-coated copper |
| Corrosion resistance | Low | Excellent |
| Vibration resistance | Breaks over time | Designed for vibration |
| Water resistance | Minimal | Rated for moisture |
| Cost per foot | $0.20-0.40 | $0.40-0.80 |
Golf carts get rained on, splashed through puddles, and vibrate constantly. Marine-grade tinned copper wire costs a few dollars more per project and lasts years longer. Use it.
Nilight 540pc Marine-Grade Heat Shrink Connectors →Wire Routing Tips
- Run wires along existing harness routes
- Protect wires with split loom tubing
- Secure every 12-18 inches with zip ties or adhesive clamps
- Keep 12V wires separated from high-voltage (36V/48V) battery cables
- Use grommets when passing through metal panels
- Heat-shrink all connections. Electrical tape unravels in heat and fails with vibration. Heat-shrink with adhesive lining creates a permanent, waterproof seal.
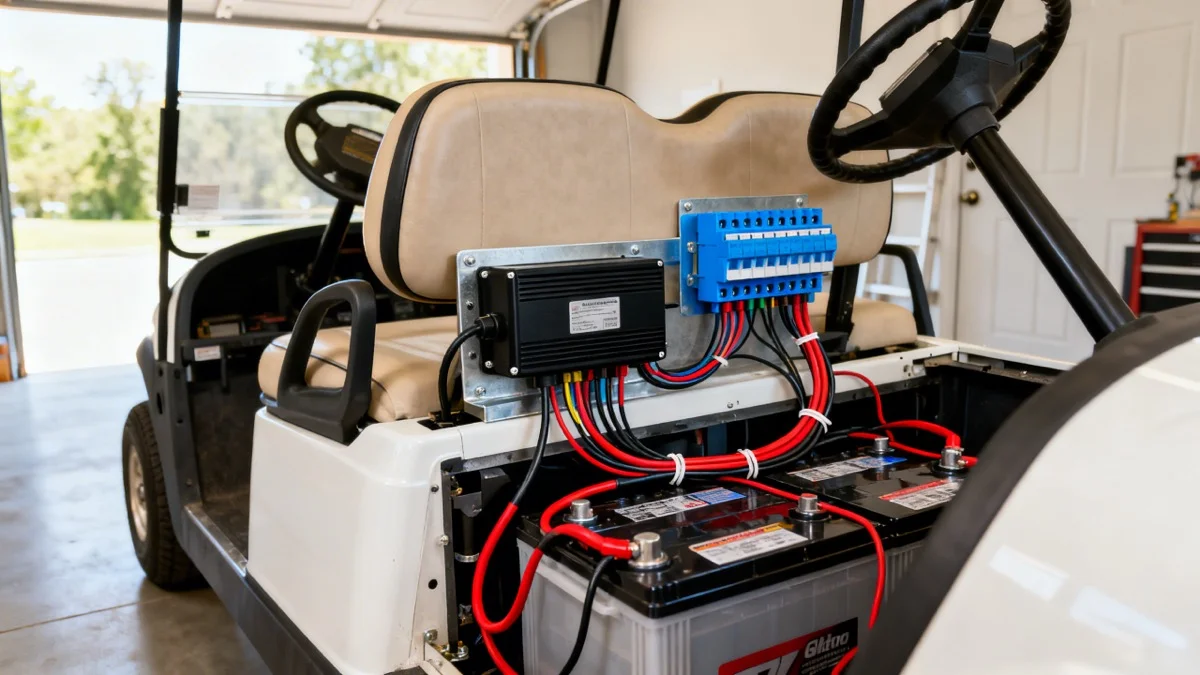
Fuse Blocks: The Heart of a Clean Install
A fuse block is a central distribution point that takes the single 12V feed from your voltage reducer and splits it into individually fused circuits for each accessory. Skip the fuse block and you end up with a rats nest of inline fuses and daisy-chained wires that is impossible to troubleshoot.
If you are starting with an existing cart that already has unknown inline fuses, map them first with our golf cart fuse box location guide.
Why a Fuse Block Beats Inline Fuses
- Organization: Each circuit is labeled and independent
- Troubleshooting: One blown fuse does not kill everything else
- Expansion: Adding a new accessory means connecting one wire to an open slot
- Safety: A short in your radio does not affect your headlights
- Clean install: One main feed wire in, multiple protected circuits out
Choosing a Fuse Block
ATC/ATO blade fuse blocks are the standard. They use the same fuses found in every auto parts store. Look for:
- 6-way for basic setups (lights + USB + horn): $12-18
- 12-way for fully loaded carts: $16-55
- Negative bus bar included (so you do not have to run individual grounds)
- LED blow indicators that light up when a fuse pops
- Cover/seal to keep out dust and moisture
For the best quality, the Blue Sea Systems ST Blade fuse blocks are the gold standard. They are marine-grade, come with a negative bus bar, and include LED indicators. For budget builds, the WUPP 12-way or Nilight 6-way work well.
Check Price: WUPP 12-Way Fuse BlockHow to Size Fuses Per Circuit
The fuse protects the wire, not the accessory. Size it between the accessory's normal draw and the wire's maximum capacity:
| Accessory | Normal Draw | Wire Gauge | Fuse Size |
|---|---|---|---|
| LED headlights | 3A | 16 AWG | 5A |
| LED taillights | 1A | 18 AWG | 3A |
| LED light bar | 5-10A | 14 AWG | 10-15A |
| Radio/speakers | 3-5A | 16 AWG | 7.5A |
| USB port | 1-2A | 18 AWG | 3A |
| Horn | 2-3A | 16 AWG | 5A |
| Turn signals | 1-2A | 18 AWG | 3A |
| Fan | 2-3A | 16 AWG | 5A |
| Heated seat | 10-15A | 12 AWG | 15-20A |
Where to Mount
Under the seat is the most common and practical location. Mount vertically or at an angle so water cannot pool in the fuse slots. Keep it away from batteries (acid fumes corrode connections). Use stainless steel screws. Leave enough clearance to swap fuses easily.
Step-by-Step Installation
Here is the complete wiring path from battery pack to working accessories. Disconnect the battery pack before starting any work.
Step 1: Plan Your Layout
Before touching a wire, list every accessory, its amperage, its mounting location, and how far the wire run will be from the fuse block. Sketch the layout on paper. This saves hours of rework.
Step 2: Mount the Voltage Reducer
Choose a dry, ventilated spot under the seat or near the battery compartment. Avoid areas that collect water or sit directly against batteries. Use self-tapping screws or a mounting bracket to secure it.
Step 3: Wire the Input Side (High Voltage)
Connect the reducer's input positive (red) to the battery pack's main positive terminal. Connect the input negative (black) to the pack's main negative terminal.
Step 4: Mount and Wire the Fuse Block
Mount the fuse block under the seat in an accessible spot. Run a 10 AWG wire from the reducer's 12V output positive to the fuse block's main input terminal. Connect the reducer's output negative to the fuse block's ground bus bar (or to a solid chassis ground point).
Step 5: Wire Each Accessory
Run individual wires from each fuse block output to each accessory. Use the wire gauge chart above to match gauge to amperage. Install the correct fuse for each circuit. Connect each accessory's ground wire back to the fuse block's ground bus or to a common chassis ground point.
Step 6: Test Before Buttoning Up
Reconnect the battery pack. Use a multimeter to verify 12.0-13.0V at the reducer output and at the fuse block. Test each accessory individually. Check for voltage drop at the farthest accessory (should not lose more than 0.5V). Once everything works, secure all wiring with zip ties and loom, then replace the seat.
Brand-Specific Wiring Guide
Every cart is slightly different. Here are the model-specific details that save you time and frustration.
EZGO TXT and RXV
EZGO TXT (36V):
- Battery configuration: six 6V batteries in series
- Tap points: main pack positive (B+) on the first battery and main pack negative (B-) on the last battery
- Factory 12V source: none on base models. If your TXT has a factory light kit, it may have a small 3-5A reducer, but that is only enough for lights. Add a separate reducer for additional accessories.
- Access: tip the seat forward to reach the battery compartment and controller
EZGO RXV (48V):
- Battery configuration: six 8V batteries (older) or four 12V (newer/lithium)
- Tap points: main pack positive and negative terminals. Make sure you are tapping full 48V, not an intermediate voltage between batteries.
- Factory 12V: 2016+ models may have a small factory converter for the light kit (3-5A). Confirm its rating before loading it with additional accessories.
- The RXV does not have the OBC charging issue that Club Car does. Your charger will work normally with a reducer installed.
The EZGO TXT is one of the easiest carts to wire thanks to its simple, accessible battery layout. For full specs and common issues, see our EZGO review.
Club Car DS, Precedent, and Onward
The Club Car OBC Problem:
This is the single most important thing to know about wiring a Club Car. Models with an On-Board Computer (OBC) (48V DS from 2000.5+, all Precedent, and Onward models) can detect the voltage reducer as a parasitic load and refuse to start the charging cycle. You install the reducer, everything works great, and then your charger stops working. This is extremely common and catches people off guard.
The fix: Wire the reducer's input through a 12V relay that disconnects when the charger is plugged in. When the charger plug activates, the relay opens and the reducer loses power, so the OBC sees no load and charges normally. When you unplug the charger, the relay closes and the reducer powers up again. Several companies sell pre-wired "OBC bypass" relay modules for $15-$30 that make this plug-and-play.
If your charger already has trouble starting, the OBC may be failing and need replacement ($150-$300). See our charging port problems guide and won't start guide for more on diagnosing Club Car charging issues.
Club Car DS (36V or 48V):
- Tap points: main pack positive and negative at the battery bank
- Factory 12V: older models have none. Later models with factory headlights may have a small reducer (insufficient for accessories).
- Run wires forward through the frame channels
Club Car Precedent (48V):
- Similar setup to DS but with a more cramped battery bay
- Factory 12V: later models with light kits have a small converter (3-5A)
- Plan your fuse block mounting carefully due to space constraints
Club Car Onward (48V):
- Factory 12V: typically includes a converter for the standard light kit (rated 20-30W)
- For anything beyond basic lights, add a separate higher-rated reducer
- Same OBC relay solution applies
For full Club Car specs, see our Club Car review.
Yamaha G29/Drive and Drive2
Good news for Yamaha owners: Yamaha does not have the OBC charging issue that plagues Club Car. The Yamaha charger initiates normally regardless of small accessory loads from a voltage reducer. This is a significant advantage.
Yamaha G29/Drive (48V):
- Battery configuration: six 8V batteries or four 12V (some models)
- Tap points: main pack positive and negative
- Factory 12V: models with factory headlights often have a small converter (3-5A)
- Generally the easiest brand to wire according to most owners
Yamaha Drive2 (2017+, 48V):
- Similar setup to G29 with updated body design
- Often equipped with a factory converter for the light package
For full Yamaha specs, see our Yamaha review.
Which Carts Have Factory 12V?
| Cart | Factory 12V? | Rating | Enough for Accessories? |
|---|---|---|---|
| EZGO TXT (base) | No | N/A | Must add reducer |
| EZGO TXT (w/ lights) | Sometimes | 3-5A | Lights only |
| EZGO RXV (2016+) | Often | 3-5A | Lights only |
| Club Car DS (pre-2000) | No | N/A | Must add reducer |
| Club Car Precedent (w/ lights) | Often | 3-5A | Lights only |
| Club Car Onward | Yes | ~2-3A | Lights only |
| Yamaha G29/Drive (w/ lights) | Often | 3-5A | Lights only |
| Yamaha Drive2 (w/ lights) | Often | 3-5A | Lights only |
Bottom line: Even carts with factory 12V outputs need an aftermarket voltage reducer if you are adding more than basic lights.
Common Mistakes to Avoid
1. No input fuse. If the reducer shorts internally, the full battery pack current flows through the input wires with nothing to stop it. That starts fires. Always install an inline fuse within 6 inches of the battery positive terminal.
2. Tapping a single battery. We covered this above: it unbalances your pack and kills that battery prematurely. Always use a voltage reducer connected to the full pack.
3. Wrong wire gauge. Undersized wire on the input side causes voltage drop and heat buildup. Use 10 AWG minimum for the main feed from batteries to reducer.
4. No fuse block. Daisy-chaining accessories off the reducer output with no circuit protection is a troubleshooting nightmare and a fire risk. Spend $15 on a fuse block.
5. Poor grounding. A loose or corroded ground causes flickering lights, buzzing radio, and intermittent operation. Sand the contact point to bare metal, use a star washer under the bolt, and apply anti-corrosion spray. If your cart has electrical gremlins, the ground connection is the first thing to check. See our troubleshooting guide for more.
6. Overloading the reducer. Running a 10A reducer with 15A of accessories. The reducer overheats, shuts down, or fails. Size the reducer to 1.5x your total load.
7. Using electrical tape. It unravels in heat, fails from vibration, and lets moisture in. Use adhesive-lined heat-shrink tubing for every connection. It creates a permanent, waterproof seal.
8. Ignoring the Club Car OBC. Installing a reducer on a Club Car and wondering why the charger stopped working. Wire a relay to disconnect the reducer during charging (see the Club Car section above).
9. Mounting in a wet area. Most reducers are not waterproof. Mount under the seat or inside a weatherproof enclosure. If your cart is heavily exposed to water (beach use, no roof), look for a waterproof-rated reducer.
10. Running 12V wires alongside battery cables. High-voltage battery cables can induce interference in 12V wiring, causing radio static and LED flicker. Keep them separated by at least a few inches.
Recommended Products
Here are the products we recommend for a clean 12V electrical install. Prices reflect typical Amazon pricing as of early 2026.
Voltage Reducers
For 48V carts (Club Car, EZGO RXV, Yamaha), a 30A switching converter handles everything from basic lights to a fully loaded accessory system:
Check Price: 10L0L 48V-to-12V 30A ReducerFor 36V carts (EZGO TXT), the same in 36V configuration:
10L0L 36V-to-12V 30A Reducer →Both are well-reviewed (4.4 stars, 1,800+ ratings) and priced around $25-38.
Must-Have Accessories for Your New 12V System
Once your electrical system is set up, a flush-mount USB panel gives you fast charging for phones and GPS devices:
YonHan Quick Charge 3.0 USB Panel with Voltmeter →And a quality phone mount keeps your device secure without draining much power at all:
Check Price: HonicWang Magnetic Alloy Phone HolderFor a complete list of what to add to your cart, see our accessories guide and customization guide.
Impact on Battery Life and Range
Adding 12V accessories draws power from your main battery pack through the voltage reducer. The impact depends on what you are running and for how long.
A typical setup (LED lights + radio + USB) draws about 8A at 12V. Through a 90%-efficient voltage reducer on a 48V system, that translates to roughly 2A draw from the pack. On a cart with 150Ah batteries, that is a small fraction of total capacity and reduces your range by roughly 5-10%.
High-draw accessories like electric heaters (15A at 12V = ~4A from 48V) or powerful sound systems (8A at 12V = ~2A from 48V) have a more noticeable impact. If range is a priority, consider a lithium battery upgrade which provides higher usable capacity, or add a solar panel to offset accessory draw during daytime use.
Turn off accessories when you do not need them. A reducer only draws power when the load is active.
Frequently Asked Questions
Can I wire LED lights directly to my golf cart batteries without a reducer?
No. LED lights designed for 12V will burn out immediately on a 36V or 48V system. Always run them through a voltage reducer. The only exception is lights specifically designed for your cart's voltage (rare and expensive).
Why is my voltage reducer getting hot?
Either you are overloading it (too many accessories for its amperage rating) or you bought a linear regulator instead of a switching converter. Check total amperage draw against the reducer's rating. If the reducer is a switching type and still running hot, it may be failing and should be replaced.
My lights flicker when I use the turn signals. What is wrong?
Usually a grounding problem. All accessories sharing one weak ground connection will interact. Run a dedicated ground wire from the flickering light back to the fuse block's ground bus bar or to a clean chassis ground point. Also check that your wire gauge is appropriate for the combined load on that circuit.
Do I need a separate switch for each accessory?
Not necessarily. Headlights and taillights are typically wired to one switch. Turn signals need their own flasher unit and switch. A radio stays on whenever the key is on. Group accessories by when you want them on, and wire each group to its own switch. A rocker switch panel with 4-5 switches keeps things clean.
Can I add solar panels to charge while running 12V accessories?
Yes. Solar panels charge your main battery pack, offsetting the draw from your 12V accessories. A 200W solar panel can add 5-12 miles of range per day and easily covers the draw of a typical 12V accessory setup.
How does this affect my golf cart's warranty?
Adding aftermarket 12V accessories through a properly installed voltage reducer and fuse block should not void your warranty for unrelated components (like the motor or frame). However, if an electrical modification causes damage (bad wiring melts a controller), that specific damage would not be covered. When in doubt, check with your dealer. For more on modifications and warranty, see our customization guide.
Golf Cart Search
Find the Best Golf Carts of 2026
Compare top-rated models, read expert reviews, and find the perfect cart for your needs.


