As an Amazon Associate, we earn from qualifying purchases. This helps support our site at no extra cost to you.
Golf Cart Battery Cable Size, Terminals & Nuts
Quick Answer: Golf Cart Battery Cable Size
Most stock golf carts use 6 AWG battery cables, but 4 AWG is the best replacement size for many 36V and 48V carts. Use 2 AWG or larger for high-amp controllers, long cable runs, lithium conversions, large tires, or steep hill use. For terminals, many deep-cycle golf cart batteries use 5/16-inch studs or bolts, while some batteries and high-current parts use 3/8-inch hardware.
Golf cart battery cables are easy to ignore until the cart slows down, clicks but will not move, smells hot, or melts a battery terminal. The cable may look like a simple jumper, but it carries the same high current that feeds the controller, motor, solenoid, charger path, and accessory wiring.
This guide covers the practical questions: what size golf cart battery cables you need, when 6 AWG is fine, when 4 AWG is the smarter upgrade, when 2 AWG makes sense, why terminals melt, and how to replace cables without creating a new electrical problem.
If you are also diagnosing weak batteries, start with our golf cart battery voltage chart. If the cart will not move at all, use the broader golf cart troubleshooting guide, golf cart troubleshooting tool, and golf cart will not start guide before ordering parts.
For replacement cable kits, battery meters, terminal cleaner, hydrometers, and watering tools, the golf cart batteries parts finder keeps the buying options grouped by battery job instead of mixing them into general accessories.
Common Stock Size 6 AWG
Best All-Around Upgrade 4 AWG
Performance Builds 2 AWG or larger
Typical Cable Set Cost $25 to $220
Common Stud Torque 95 to 105 in-lbs
Most Common Failure Loose or corroded ends
Golf Cart Battery Cable Size and Terminal Chart
Use this as the fast answer before ordering golf cart cables, nuts, washers, or ring terminals.
| Question | Common answer | What to verify |
|---|---|---|
| Stock golf cart battery cable size | 6 AWG | Fine for many stock carts if cables are clean and short |
| Best replacement cable size | 4 AWG | Good all-around upgrade for many 36V and 48V carts |
| Performance cable size | 2 AWG or larger | Match controller amperage, motor load, BMS limit, and cable length |
| Common battery terminal size | 5/16-inch stud or bolt | Some batteries and components use 3/8-inch hardware |
| Common cable lug hole | 5/16 inch or 3/8 inch | Match the battery post, solenoid, controller, and bus bar |
| Common 5/16 terminal torque | About 95 to 105 in-lbs in many deep-cycle battery specs | Check the battery maker's label or manual |
| Common 3/8 terminal torque | Often higher than 5/16 hardware | Do not reuse the 5/16 spec without checking |
The safest buying move is to measure the original cable length center-to-center, match the lug hole to the actual terminal, and replace every cable in the high-current path with the same gauge. A 4 AWG battery jumper does not help much if the controller or solenoid cable is still old, corroded 6 AWG.
Golf Cart Battery Cables: Quick Answer
Most stock golf carts use 6 AWG battery cables, but 4 AWG is the best replacement size for many owners because it reduces resistance, voltage drop, and heat without becoming difficult to route. Use 2 AWG or larger when the cart has a high-amp controller, performance motor, heavy passenger loads, long high-current cable runs, big tires, steep hills, or a serious lithium battery conversion.
The fastest safe rule:
- Stock cart, clean OEM setup: 6 AWG can be fine
- Older cart, corroded cables, mild upgrades: 4 AWG is usually the sweet spot
- 500A controller, big motor, lifted cart, hard hill use: 2 AWG or larger deserves a serious look
- Unknown used cart: inspect and measure before you buy any cable kit
If the wiring is one of several issues on an older cart, verify the model year with the golf cart serial number and VIN guide and compare the repair total against the golf cart value calculator before replacing every cable.
Golf Cart Battery Cable Size Chart
The right cable size depends on current, cable length, temperature, connection quality, and how hard the cart is used. Published cable-kit guidance from golf cart parts suppliers commonly separates systems around controller amperage. One practical example is Golf Cartology's 300A, 400A, and 500A cable guidance, which maps lower-amp systems to 6 AWG, 400A systems to 4 AWG, and 500A-plus systems to 2 AWG.
Use this chart as a buying starting point, not a replacement for your controller or battery manual.
| Cart setup | Practical cable size | Why it fits |
|---|---|---|
| Stock older 36V cart, no performance upgrades | 6 AWG | Often matches OEM wiring and short battery jumpers |
| Stock 48V cart with old or corroded cables | 4 AWG | Better heat margin and lower voltage drop than tired 6 AWG |
| Neighborhood cart with lights, USB, stereo, and normal tires | 4 AWG | Good durability without bulky routing |
| Lifted cart with larger tires or frequent hill use | 4 AWG minimum | Higher load creates more heat through weak cables |
| 400A controller upgrade | 4 AWG | Common performance-cable baseline |
| 500A-plus controller or big motor package | 2 AWG or larger | Higher current needs more copper and better lugs |
| Long custom cable run | Size up one step | Longer cables increase voltage drop |
| Lithium conversion with high discharge rating | 4 AWG or 2 AWG | Match the BMS, controller, and motor limits |
If the cart is a stock Club Car, EZGO, or Yamaha, a model-specific 4 AWG kit is usually easier than building cables from scratch. If the cart has an aftermarket controller, non-stock battery layout, or relocated pack, measure everything before ordering.
6 AWG vs 4 AWG vs 2 AWG Golf Cart Cables
Cable gauge is backwards from what new owners expect. A smaller AWG number means a thicker cable. 2 AWG is larger than 4 AWG, and 4 AWG is larger than 6 AWG.
6 AWG Battery Cables
6 AWG is common on stock golf carts, especially older 36V and 48V systems that were not built for high-output controllers. It is flexible, inexpensive, and easy to route between batteries.
Use 6 AWG when the cart is stock, the controller is not upgraded, the cable run is short, the cart lives on flat ground, and you are replacing one OEM-size jumper in an otherwise healthy pack.
The risk is age. A 6 AWG cable that was fine when new can become a problem after years of acid mist, vibration, heat cycles, and corrosion hidden under the insulation. If several cables are green, stiff, swollen, or heat marked, do not replace one jumper and call it done.
4 AWG Battery Cables
4 AWG is the best practical upgrade for many carts. It gives more copper cross-section than 6 AWG, reduces voltage drop, and is still flexible enough for most battery compartments.
Use 4 AWG when you are replacing a full cable set on an older cart, the cart has mild upgrades, the cart carries four passengers often, or you drive hills, soft grass, beach-town roads, or long neighborhood routes.
Current retail examples support the range. Batteries in a Flash lists 6 AWG Club Car cable sets around $27, while Golf Cartology lists a 4 AWG complete cable kit around $150 with model, battery-layout, and OBC options.
2 AWG and Larger Battery Cables
2 AWG is for carts that work harder than stock. That can mean a Navitas or Alltrax-style high-amp controller, big tires, heavier passenger loads, towing, steep hills, or a lithium setup that can deliver high current without the voltage sag of tired lead-acid batteries.
Use 2 AWG when the controller maker recommends it, the cart has a 500A-plus controller, cable runs are longer than stock, or the cart repeatedly melts terminals after cleaning and torque correction.
Do not install 2 AWG only because it sounds stronger. It costs more, is harder to bend, and can stress soft battery posts if routed poorly. Good 4 AWG cables beat poorly crimped, poorly routed 2 AWG cables every time.
Symptoms of Bad Golf Cart Battery Cables
Bad golf cart battery cables often mimic bad batteries, a bad solenoid, or a failing controller. That is why cable inspection should happen before you replace expensive parts.
If the cable set tests clean but the cart still surges, cuts out, or limits speed, compare the symptoms against our golf cart controller guide before replacing the controller.
Look for these symptoms:
- sluggish acceleration from a full charge
- cart slows hard on hills
- range drops even though batteries test close to normal
- solenoid clicks but the cart does not move
- intermittent shutdowns over bumps
- battery terminal gets warm after a short drive
- burnt smell under the seat
- white, blue, or green corrosion at cable ends
- swollen insulation near a lug
- cable feels stiff instead of flexible
- copper strands are black or green when the end is cut back
- charger plug or onboard charger acts inconsistently because pack wiring is poor
If the main symptom is a click with no movement, read our golf cart solenoid symptoms guide too. Solenoids get blamed for cable problems all the time. A loose high-current cable can create the same no-go symptom without the solenoid being the root cause.
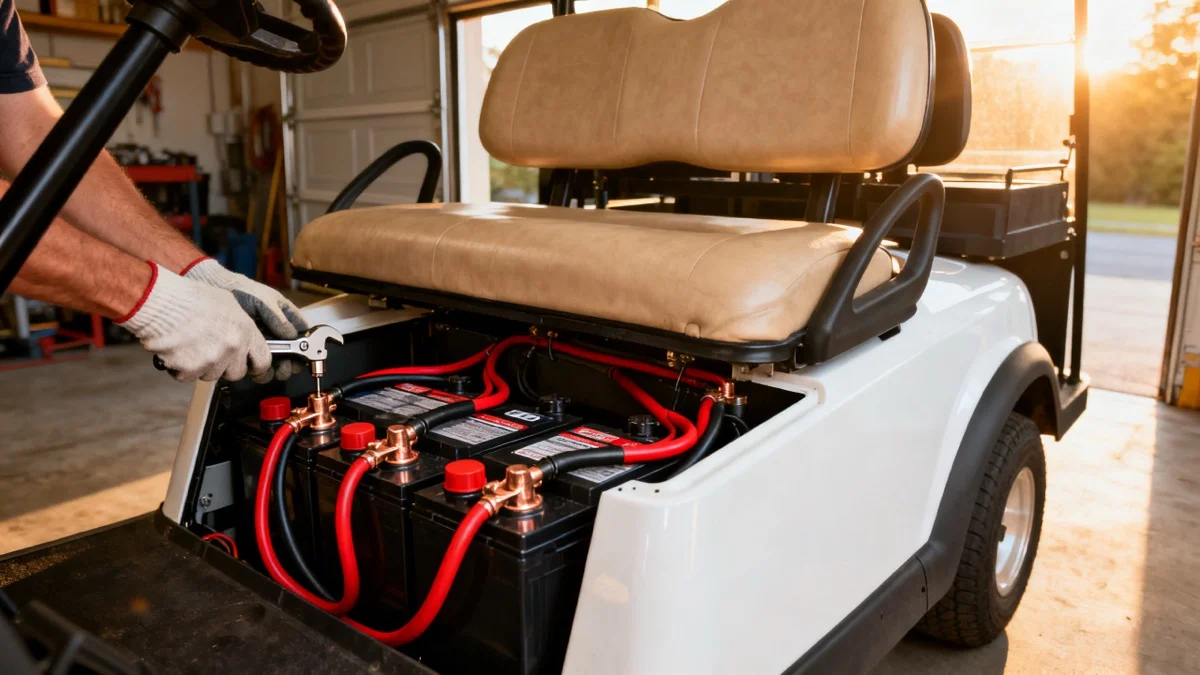
Why Golf Cart Battery Terminals Melt
A melted terminal is almost always a heat problem, and heat usually comes from resistance. Golf carts pull high current. A tiny amount of resistance at a bad lug, loose nut, corroded cable end, or cracked battery post can make enough heat to soften lead and melt plastic around the terminal.
Loose Terminal Nuts
Loose connections are the most common cause. Golf carts vibrate, batteries move slightly, and soft lead terminals do not tolerate repeated over-tightening. If a nut backs off even a little, the contact patch shrinks. Current then flows through a smaller area, heat rises, and the terminal can melt quickly.
Many deep-cycle batteries with 5/16-inch studs call for 95 to 105 inch-pounds, not foot-pounds. Interstate publishes that exact range for 5/16-inch stud terminals in its golf cart battery installation guidance. Golf Car Advisor gives the same 95 to 105 in-lb range for UTL and UT terminals and notes that other terminal types can differ.Golf Car Advisor
Corrosion Inside the Cable
Surface corrosion is obvious. Hidden corrosion is worse. Acid vapor can wick under the insulation and into the copper strands. The lug may clean up nicely on the outside while the cable remains rotten inside.
That is why a badly corroded cable should usually be replaced, not just scrubbed. If you cut the insulation back and the copper is dark, green, brittle, or powdery, the cable has already failed.
Poor Crimps and Cheap Lugs
A cable is only as good as its lug. Cheap crimp ends, loose ring terminals, thin stamped lugs, and soft hardware create high resistance. For a stock cart that only drives from garage to mailbox, it may limp along. For a lifted cart or hill route, it can get hot fast.
Look for:
- tinned copper lugs
- hydraulic or proper hex crimps
- adhesive-lined heat shrink
- pure copper cable, not copper-clad aluminum
- correct lug hole size
- enough flexibility to route without pulling on terminals
Accessory Wires Stacked Wrong
Accessory wires for lights, stereos, fans, USB chargers, and voltage reducers should not be randomly stacked under battery nuts. High-current battery cables should sit flat against the terminal. Small accessory rings stacked underneath can prevent the main cable from seating properly.
If you are adding 12V accessories, use a proper reducer and fuse block. Our golf cart wiring and voltage reducer guide explains the cleaner way to power lights, speakers, fans, and phone chargers without overloading battery posts.
Overfilled or Messy Flooded Batteries
Lead-acid batteries vent during charging. If they are overfilled, charged hard, or left dirty, acid residue collects around posts and cable ends. That residue speeds corrosion and increases the chance of a hot connection.
If this is a recurring problem, read the battery watering systems guide and maintenance guide. A watering system does not fix bad cables, but it can reduce the maintenance mistakes that create acid mess around terminals.
How to Inspect Golf Cart Battery Cables
Do this inspection with the cart off, key removed, and battery pack disconnected safely.
Step 1: Photograph the Battery Layout
Before touching anything, take clear photos from multiple angles. Capture every jumper, the main positive, the main negative, charger leads, voltage reducer leads, and any accessory wires.
This is not optional. A 36V or 48V pack is a series circuit. One wrong cable can create a no-start, charger problem, sparks, or a damaged controller.
Step 2: Check for Heat Marks
Look for melted insulation, brown or black discoloration, warped plastic around the battery post, or lugs that look dull and pitted. A terminal that got hot once deserves extra attention even if the cart still runs.
Step 3: Tug Each Cable End
A good cable end should not wiggle on the lug or pull away from the crimp. If the lug moves independently of the cable, replace it.
Step 4: Look Under the Insulation
If one cable is obviously bad, cut back a small section after removal. Bright copper is good. Black, green, powdery, or stiff strands mean corrosion has traveled inside.
Step 5: Test Voltage Drop Under Load
A resting voltage test tells you about batteries. A voltage-drop test tells you about connections. If you are not comfortable testing suspect cable sections while the cart is safely restrained, use a repair shop. High-current testing is not the place to learn by guessing.
For basic battery testing, the AstroAI multimeter is a budget tool that is already good enough for pack voltage, individual batteries, and continuity checks.
Check AstroAI Multimeter PriceHow to Replace Golf Cart Battery Cables
Replacing battery cables is a realistic DIY job if you are organized, patient, and comfortable around batteries. If the cart has melted posts, unknown wiring, aftermarket controller work, or a lithium conversion, paying a golf cart repair shop is reasonable.
Tools and Supplies
You may need safety glasses, gloves, an insulated wrench, an inch-pound torque wrench, a multimeter, terminal brush, battery cleaner, dielectric grease or terminal protectant, correct replacement cables, and a phone camera for before and after photos.
For cleaning, a purpose-made brush is cheap and more effective than trying to scrape around every post with a screwdriver.
Schumacher Terminal Cleaning Brush ->For acid residue, a battery cleaner with indicator helps show where residue remains.
CRC Battery Cleaner with Indicator ->Step 1: Make the Cart Safe
Park on level ground. Set the parking brake. Remove the key. If the cart has a tow/run switch, place it in tow. Unplug the charger. Remove jewelry and keep loose tools away from the battery tops.
Disconnect the main negative cable first, then isolate it so it cannot spring back and touch a post. After that, disconnect the main positive and the remaining jumpers.
Step 2: Label and Remove One Cable at a Time
Use tape labels or work one cable at a time. Do not trust memory. One crossed cable can create a serious short.
Step 3: Clean the Posts
Clean each battery post and contact surface until it is bright and flat. If the post is melted, cracked, heavily pitted, or missing material, do not just clamp harder. You may need battery replacement or professional terminal repair.
Step 4: Compare Cable Length and Lug Size
Before installing, verify gauge, copper construction, length, lug hole size, sealed heat shrink, and natural bend radius. Do not force a short cable to reach. A tight cable can loosen a post over time.
Step 5: Install High-Current Cables Flat Against the Terminal
The main cable lug should sit flat against the battery terminal. Small accessory wires should sit above the main cable or, better, move to a fused distribution point. Do not sandwich small rings under a high-current lug.
Step 6: Torque Correctly
Use the battery manufacturer's spec when possible. For many 5/16-inch deep-cycle studs, 95 to 105 inch-pounds is common. That is roughly 8 to 9 foot-pounds, but use an inch-pound wrench if you can.
Over-tightening can damage a soft lead post. Under-tightening can melt it. Both are expensive mistakes.
Step 7: Protect the Connection
After the cable is tight, add a light protective coating. Do not glob grease between the lug and the battery post before tightening, because the metal-to-metal contact needs to be clean first.
Dielectric grease is useful after the joint is tight and clean, especially on carts in coastal towns, humid garages, and storage sheds.
Permatex Dielectric Grease ->Step 8: Recheck After the First Drive
Drive for 10 to 15 minutes, then stop and inspect. Do not touch metal terminals with bare hands, but check carefully for smell, discoloration, loose cables, or insulation that feels warmer than surrounding cables. After the first few rides, recheck torque.
What to Buy: Cable Kit, Individual Cable, or Custom Set
Most owners should buy a model-specific kit for the exact cart, voltage, and battery layout. A Club Car Precedent with six 8V batteries does not use the same cable lengths as an EZGO TXT or a Yamaha Drive2.
An individual cable is fine when one jumper was damaged and the rest of the set is clean, flexible, and recent. Measure center-to-center between lug holes, match gauge, match lug size, and avoid copper-clad aluminum.
Use custom cables when the cart has a controller upgrade, lithium conversion, relocated battery pack, custom bus bars, or non-standard routing. Custom 2 AWG or 1/0 cables cost more, but they prevent stretched cables, bad bends, and mismatched lengths.
Brand Notes: Club Car, EZGO, Yamaha, ICON
Cable fitment is about layout, not just voltage. Club Car DS and Precedent layouts vary by year and battery configuration, so do not copy a forum photo without checking your cart. EZGO TXT, RXV, Medalist, and Marathon carts can use different lengths and controller routing, and the charging side may also point you toward our EZGO TXT charger guide or charger plug compatibility guide. Yamaha G-series and Drive/Drive2 carts have their own battery layouts too, and the Yamaha review covers related gas-cart issues like clutch wear.
Many newer ICON, Evolution, Star EV, and Atlas carts use lithium systems, different controllers, and factory harnesses that are less DIY-friendly than older lead-acid carts. If the cart is under warranty, call the dealer before replacing high-current cables yourself. Our golf cart warranty guide explains how electrical modifications can affect coverage.
Cable Replacement Cost in 2026
Here is a realistic 2026 cost range:
| Job | Parts | Labor | Typical total |
|---|---|---|---|
| Replace one short jumper cable | $8 to $25 | $0 to $75 | $8 to $100 |
| Basic 6 AWG battery cable set | $25 to $60 | $0 to $100 | $25 to $160 |
| 4 AWG model-specific cable set | $30 to $220 | $75 to $150 | $105 to $370 |
| Custom 2 AWG cable set | $120 to $300-plus | $100 to $250 | $220 to $550-plus |
| Melted terminal diagnosis and cable repair | $20 to $150 | $75 to $200 | $95 to $350 |
Those numbers change by region, cart model, and how messy the battery compartment is. A clean used golf cart with one bad jumper is cheap. A corroded fleet cart with melted posts, accessory wiring, and mismatched batteries is not.
If you are shopping rather than repairing, use our golf cart pricing guide, used golf cart prices by brand, and local dealer directory to compare the cost of repair against buying a cleaner cart.
Cable Problems vs Battery Problems
Bad cables and weak batteries overlap. If one terminal gets hot, one cable end keeps turning green, or the cart clicks while pack voltage is good, inspect cables first. If pack voltage is low after charging, one battery reads much lower than the rest, or the cart fades after 20 minutes of driving, suspect the batteries first.
The best sequence is simple: test pack and individual battery voltage using the battery voltage chart, inspect the cables, clean and torque connections, then test under load if symptoms remain. Only then blame the solenoid, controller, charger, or motor.
If your lead-acid pack is old and you are already replacing cables, it is worth deciding whether to stay lead-acid or move to lithium. The lithium conversion guide, range guide, and charging time guide walk through the bigger decision.
Preventing Corrosion and Repeat Melting
Cable replacement fixes the damaged part. Maintenance keeps it from coming back.
Keep the Battery Tops Clean
Dirt and acid film can create small current paths across the battery top. Wipe the battery tops during monthly checks, especially if the cart lives in a humid garage, near the coast, or gets driven daily.
For coastal owners, combine this with the advice in our golf cart rust prevention guide. Salt air attacks more than the frame. It also attacks cable ends, charger ports, controller connectors, and light wiring.
Add Water Correctly
For flooded batteries, add distilled water only when appropriate and do not overfill. Many owners overfill before charging, then the electrolyte expands and leaves corrosive residue around the posts. That residue eventually finds cable ends.
Use a Proper Voltage Reducer
Do not power 12V accessories by tapping random batteries in the pack. It unbalances the pack and adds extra wiring at battery posts. Use a reducer and fuse block, especially for lights, fans, sound bars, phone mounts with chargers, and accessories from our dashboard tech upgrades guide.
Recheck Torque
After replacing cables, recheck terminal torque after a few rides and then monthly. Battery cable nuts can loosen after the new lugs settle.
Secure the Cables
Cables should not rub against seat frames, sharp brackets, battery hold-downs, or moving suspension parts. Use loom, clips, and zip ties where needed. Leave enough slack for battery movement, but not enough for cables to flop around.
When to Call a Repair Shop
DIY cable replacement is reasonable on a clean stock cart. Call a pro when:
- a battery post is melted or cracked
- the same terminal melted twice
- the cart has lithium batteries and is under warranty
- the controller or motor was upgraded
- you see burnt wiring beyond the battery compartment
- the cart shuts down while driving
- the cable gets hot even after replacement
- you do not know which cables belong to the charger, reducer, controller, or solenoid
You can find local help through our golf cart repair directory. If you are in a major golf cart state, local pages like Florida repair shops, Arizona repair shops, and Texas repair shops can help you compare nearby options.
Frequently Asked Questions
What size battery cables do golf carts use?
Most stock golf carts use 6 AWG battery cables, while many replacement and upgraded carts use 4 AWG. Performance carts with 500 amp controllers, long high-current runs, big tires, or heavy loads may need 2 AWG or larger cables.
Are 4 gauge battery cables good for a golf cart?
Yes. 4 AWG is the best all-around replacement size for many 36V and 48V carts. It has better heat margin than old 6 AWG cable and is easier to route than 2 AWG.
Should I use 2 gauge battery cables on my golf cart?
Use 2 AWG when the cart has a high-amp controller, performance motor, lithium conversion, oversized tires, steep hill use, heavy passenger loads, or longer cable runs. For a stock neighborhood cart, 2 AWG is usually unnecessary.
Why do golf cart battery cables melt?
They melt when resistance creates heat. Loose terminal nuts, hidden corrosion, poor crimps, undersized wire, accessory wires stacked wrong, cracked posts, and acid residue are the usual causes.
Can a bad battery cable make a golf cart slow?
Yes. Bad cables create voltage drop under load. The cart can feel weak, slow on hills, jerky, or intermittent even when battery voltage looks fine at rest.
How much does golf cart battery cable replacement cost?
Basic cable sets often cost about $25 to $60. Complete 4 AWG kits commonly run $55 to $220, and professional diagnosis or installation can add about $75 to $150.
Can I replace one golf cart battery cable?
Yes, if the rest of the cables are clean, flexible, correctly sized, and recent. Replace the full set if several cables are corroded, stiff, heat damaged, mismatched, or old.
How tight should golf cart battery terminals be?
Many 5/16-inch deep-cycle battery studs call for 95 to 105 inch-pounds. Check your battery maker specification because terminal styles differ. Do not guess with a large foot-pound torque wrench.
Golf Cart Search
Find the Best Golf Carts of 2026
Compare top-rated models, read expert reviews, and find the perfect cart for your needs.